


Piękne!!
Czegoś takiego szukałem!!!
Wodnik 1:50
-
JurekBin

- Posty: 1562
- Rejestracja: 04 gru 2010, 21:55
- Lokalizacja: {"name":"Austria","desc":"","lat":"","lng":""}
- Kontakt:
-
oksal

- Posty: 1897
- Rejestracja: 04 gru 2010, 21:55


-
KID

- Posty: 246
- Rejestracja: 04 gru 2010, 21:55
Odp:Wodnik 1:50
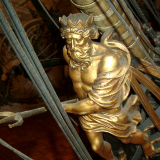
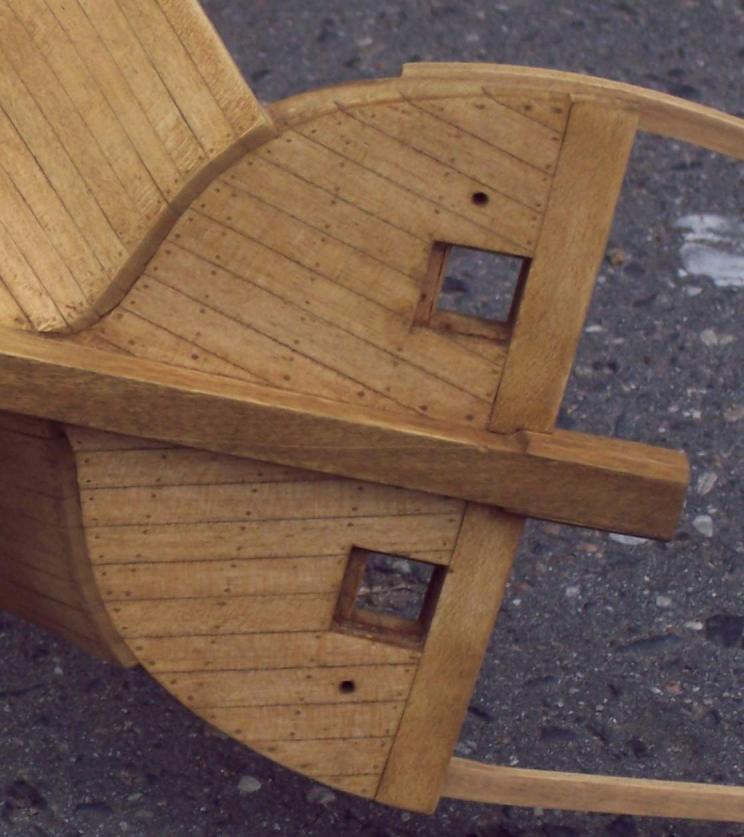
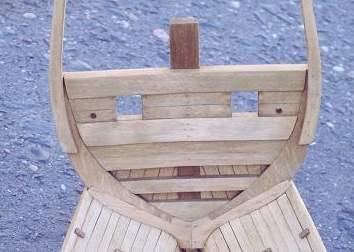
Jako uzupełnienie informacji na temat: do czego kołkować poszycie rufy załączam zdjęcia modelu Vasy autorstwa Jarka Kosmalskiego.
Pozdrawiam,
Krzysztof Duvnjak
Krzysztof Duvnjak
-
JurekBin
- Posty: 1562
- Rejestracja: 04 gru 2010, 21:55
- Lokalizacja: {"name":"Austria","desc":"","lat":"","lng":""}
- Kontakt:
Odp:Wodnik 1:50
Dzięki KID i oksal; już mam koncepcję na ten temat :)
Ale zanim do tego dojdzie, zacząłem poszywać i przechodzę męki wyginania listew. Najpierw gotuję a potem w imadło i wyginam na przykład te kawałki dochodzące do pawęży:

No i dziś ułożyłem po 2 rzędy z każdej burty :)
Jednak układam z kawałków 14 cm, wygodniej się je gotuje :whistle: Inaczej miałbym kłopot ze znaleziem tak długiego naczynia:


Acha, poniżej odbijacza poszywam brzozą 2x7 mm. Szkoda mi orzecha skoro i tak będzie dno malowane na biało.
Jurek
Ale zanim do tego dojdzie, zacząłem poszywać i przechodzę męki wyginania listew. Najpierw gotuję a potem w imadło i wyginam na przykład te kawałki dochodzące do pawęży:
No i dziś ułożyłem po 2 rzędy z każdej burty :)
Jednak układam z kawałków 14 cm, wygodniej się je gotuje :whistle: Inaczej miałbym kłopot ze znaleziem tak długiego naczynia:
Acha, poniżej odbijacza poszywam brzozą 2x7 mm. Szkoda mi orzecha skoro i tak będzie dno malowane na biało.
Jurek
-
JurekBin
- Posty: 1562
- Rejestracja: 04 gru 2010, 21:55
- Lokalizacja: {"name":"Austria","desc":"","lat":"","lng":""}
- Kontakt:
Odp:Wodnik 1:50
Moja ciężka walka z poszyciem trwa nadal. Już przećwiczyłem wiele metod gięcia listew, gotowanie, narzędzia z amati takie ala lutownica .... no i płomień, gdzie mokra listwa sobie się grzeje nad świeczką... chyba ta metoda mi odpowiada ;) cicha i miła, po kilku minutach brzoza się robi całkiem miękka.... no i nie trzeba już prawie suszyć:

Ponieważ poszycie na dziobie nijak nie chciało się układać równo, więc chyba już dlatego przed wiekami wymyślono stealersy!!! No cóż, trzeba się za nie zabrać, moje obolałe palce muszą to znieść.
Wodnik został zbudowany najprawdopodobniej w 1623 na modę holenderską! Nie wiadomo czy przez Holendrów, ale w ich stylu..... więc stealersy muszą być odpowiednie:

Listwa nacięta i mokra i podgięta podsuszona tuż przed klejeniem:

No i tak wygląda 1szy stealer... na dziś mam dość... jutro dalej pociosam:

Jurek
Ponieważ poszycie na dziobie nijak nie chciało się układać równo, więc chyba już dlatego przed wiekami wymyślono stealersy!!! No cóż, trzeba się za nie zabrać, moje obolałe palce muszą to znieść.
Wodnik został zbudowany najprawdopodobniej w 1623 na modę holenderską! Nie wiadomo czy przez Holendrów, ale w ich stylu..... więc stealersy muszą być odpowiednie:
Listwa nacięta i mokra i podgięta podsuszona tuż przed klejeniem:
No i tak wygląda 1szy stealer... na dziś mam dość... jutro dalej pociosam:
Jurek
-
JurekBin
- Posty: 1562
- Rejestracja: 04 gru 2010, 21:55
- Lokalizacja: {"name":"Austria","desc":"","lat":"","lng":""}
- Kontakt:
Odp:Wodnik 1:50
Mini tutorial, manual, jak-to-zrobić:
Holenderskie Stealery:
Tu się jeden nakleja właśnie:

Biorę listewkę 7 mm szerokości, 2 mm grubości i ołówkiem zaznaczam linię przecięcia się na "oko":

Szybko docinam po skosie:

I zaznaczam dalej również prawie 'na oko':

Oczywiście obcinam dalszy kawałek, i co ważne teraz hebelkiem sciągam kawałek szerokości listwy ale pod kątem, tak aby przekrój liswty stanowił trapez!

Metodą woda i ogień i mięśnie naginamy:

Aż czasami się przesadzi :( i wówczas wracamy do punktu wyjścia :angry:

No ale za drugim razem już może być lepiej:

No już mam po 3 z każdej burty:

Chciałem zaznaczyć, że to są moje pierwsze stealersy oraz historyczne poszywanie dość grubą listwą, więc nie jest to jeszcze jakość modelu klasy muzealnej, ale pierwsze koty za płoty.
Pozdrawiam
Holenderskie Stealery:
Tu się jeden nakleja właśnie:
Biorę listewkę 7 mm szerokości, 2 mm grubości i ołówkiem zaznaczam linię przecięcia się na "oko":
Szybko docinam po skosie:
I zaznaczam dalej również prawie 'na oko':
Oczywiście obcinam dalszy kawałek, i co ważne teraz hebelkiem sciągam kawałek szerokości listwy ale pod kątem, tak aby przekrój liswty stanowił trapez!
Metodą woda i ogień i mięśnie naginamy:
Aż czasami się przesadzi :( i wówczas wracamy do punktu wyjścia :angry:
No ale za drugim razem już może być lepiej:
No już mam po 3 z każdej burty:
Chciałem zaznaczyć, że to są moje pierwsze stealersy oraz historyczne poszywanie dość grubą listwą, więc nie jest to jeszcze jakość modelu klasy muzealnej, ale pierwsze koty za płoty.
Pozdrawiam
-
oksal
- Posty: 1897
- Rejestracja: 04 gru 2010, 21:55
Odp:Wodnik 1:50
Nie narzekaj. Ponad linia wodna będzie dużo szybciej:) sam bym juz chciał jakis inny nowy kadłub poszywać
Pozdrawiam Adam
Pozdrawiam Adam
-
Tomek Aleksinski

- Posty: 410
- Rejestracja: 04 gru 2010, 21:55
Odp:Wodnik 1:50
Z duzym zainteresowaniem sledze od niedawna Twoja prace nad twym Wodnikiem. Moze nie bede tu sie wypowiadal nad sposobem budowania szkieletu kadluba, ktory Ty zastosowales (kazdy robi jak woli), ale jesli chodzi o giecie listewek drewnianych na mokro/goraco, to Twe poty sa zupelnie niepotrzebne, mysle.
Poza tym, ten plomien swieczki moze byc niebezpieczny, bo przypadkowo mozesz osmalic listewke czy nawet spalic swoj model.
Gotowanie listewek przed ich dalszym 'torturowaniem' w imadle, tez nie jest konieczne, a nawet szkodliwe dla wlokien drewnianych.
Ja przed latami zetknalem sie z bezbledna technika niemieckiego modelarza Gebharda Kammerlandera, ktory robi to w sposob "prosty, latwy i przyjemny" i w jego rezultacie mozna uzyskac poszycie idealnie rowne i precyzyjne. Kiedys w amerykanskim magazynie modelarzy szkutniczych "Ships in Scale" byl artykul o tej wlasnie technice, ktora ja z wielkim sukcesem zaadoptowalem dla wlasnych potrzeb (moja nieco wieksza skala od modeli Gebharda).
Technika ta polega na wzglednie krotkim czasie (kilka minut) namoczenia listewek w LETNIEJ wodzie i wyginania ich, albo bezposrednio na szkielecie kadluba albo na osobnej deseczce za pomoca goracej kolby do lutowania zaopatrzonej w specjalna glowice (mozna taka glowice kupic bezposrednio od Gebharda albo zrobic sobie samemu z kawalka mosiadzu czy aluminium. Masz przy tym 100 % kontrole nad calym procesem, a listewki wygiete nadmiernie mozesz ponownie 'odgiac' ta sama technika.
Poniewaz Ty jestes dosc bieglym w jezyku angielskim, zalaczam tu fragment oryginalnego tekstu-instrukcji na ten wlasnie temat:
Wood Bending System 3000
Some thoughts about bending wood
--------------------------------------------------------------------------------
The most common task associated with the construction of historical ship models is the bending and forming of wood. Timber used for practically every part of a model hull must be worked to the shape required. More than 30 years ago, when my interest in historical model ship building started, I searched the related literature for everything I could find on how to bend wood. I tried every procedure suggested. But nothing seemed really practical. Some methods suggested "cooking" wood strips as a prelude to bending. Ridiculous! Equally silly - silly, that is, to me - were recommendations to use various mechanical devices to "torture" wood into shape. Crunching wood into shape did not seem to be the answer, I thought. Even raw steam, the popular method, was less than desirable for model building. To bend wood effectively, it's first necessary to understand its composition. It has, of course, a cellular structure. Naturally, each wood type is slightly different, as we would expect. But all woods contain elongated cells and a membrane around each cell that absorbs, retains, or releases moisture. Generally, wood cells absorb water through the membrane at rates about five times greater than the rates at which they release water. Because it's so important to the structure of wood, cell membrane should NEVER be destroyed. When the membrane of a wood cell is destroyed, it's only a matter of time before structural problems arise. Sealing the surfaces of cellular damaged wood with various types of finishes merely delays the outcome of cellular destruction. I use the word "destruction" because that's what happens. When wood cells are cooked, moisture within "explodes," bursting moisture*retaining membrane. Although invisible, serious structural damage does indeed occur. It remains a mystery to me where the idea of boiling wood for model building ever came from. It's certainly not found in the classical ship building literature. Shipwrights of old formed wood for their vessels in a manner quite different from "cooking." Large planks were steamed. Thinner planks were first wetted out. Then, they were weighted to shape. And, finally, a fire was lit under the wood as it was kept wet with mops and brushes until the heat from the fire and the pressure from the weight gradually bent the wood to the desired shape. No cooking. No crunching. Based on my thinking and experimenting, I developed the wood bending system that I now use in my work. The primary component is a 20-30 watt soldering iron in which I mount a forming/bending tip (#3003) for thin timber or, for thicker timber, a plank bender (#3006).The system is extremely simple. It's designed for hour-after-hour of continuous use. Wood to be bent is first soaked in cold water. One to 15 minutes is enough, depending on the type of wood. The wood must be thoroughly wet - but not saturated. It must not, that is, be sopping wet. After removal from the soak dish, after draining or "resting" for a few minutes, the wood is ready for bending or forming. For thin timber, using the forming/bending tip(#3003), heat and pressure are applied with the iron held in one hand while the other hand is used to bend and hold the wood to the exact shape required. The heat and pressure of the iron "set" the wood. Most important of all, the newly acquired shape of the wood will be retained after the heat and pressure are removed. For heavier timber, the plank bender (#3006) is used. The iron iron fitted with the plank bender is held in one hand. The wet plank is inserted into the holder
on the bender with the other hand. Then the plank is gently bent down to the desired shape. Again, the heat and pressure "set" the wood to desired shape. And it remains. Using the forming/bending tip (#3003), it's even possible to bend thin wood "the wrong way." (See photo) Handrails, for example, can be formed to the exact shape required. The wood can be bent
directly on a tracing of the rail shape. For modelers interested in this technique, I suggest practicing on some scrap wood. Wet and bend wood of all types and dimensions. After just a little experimenting, most model builders are pleasantly surprised at how simple*and useful!*this wood bending technique really is.
The wood bending/forming system consists of a soldering iron (#3001), the forming/bending tip, and the plank bending tip.
Z racji tego, ze mieszkasz w Austrii, znasz tez bez watpienia dobrze jezyk niemiecki, zalaczam wiec odpowiedni link do instrukcji/broszurki na temat techniki budowania modeli wg. Gebharda - znajdziesz tam rowniez fragment o plankowaniu i gieciu drewna za pomoca jego glowicy nasadzanej na taka kolbe.
Warto sobie przestudiowac te teksty.
http://www.gk-modellbau.de/DownloadData/Anleitung.PDF
Kiedys zamiescilem swoj nieduzy tekscik po polsku na temat uproszczonej techniki pana Kammerlandera (giecie drewna na goraco) na witrynie Marka Kalka Mareckiego. Mysle, ze jest tam on jeszcze do dzis.
Zycze duzo przyjemnosci przy budowie Twego modelu!
-
JurekBin
- Posty: 1562
- Rejestracja: 04 gru 2010, 21:55
- Lokalizacja: {"name":"Austria","desc":"","lat":"","lng":""}
- Kontakt:
Odp:Wodnik 1:50
Dziękuje Tomku za cenne uwagi. Już na wstępie wspomniałem że Wodnik to mój debiut w tej dziedzinie.
W tej chwili testuje różne metody gięcia i jestem pewien, że w swego czasu też przez ten etap przeszedłeś. Poza tym mam z tego niezłą zabawę.
Motoda ogień i woda :-) jest tu również opisana:
No może gotowanie to faktycznie nie jest najlepszy pomysł, ponieważ włóka wyłażą... ale tak się właśnie człowiek uczy.
Lutownicę z okrągłym końcem, kupiłem tę od amati, napewno wielu widziało zdjęcia. Swego czasu Marecki pokazywał też swoje testy. I napewno będę ją używał do cieńszych listew. Jednak podczas prób gięcia 3 mm orzecha ta lutownica wydawała mi się dość mało skuteczna. I samo gięcie wales zapoczątkowałem na klocku o kstałcie dziobu - aczkowliek po wstępnym gotowaniu :S
Mam nadzieję, że dalej będziesz mi w jakiś sposób pomagał.
Pozdrawiam
Jurek
W tej chwili testuje różne metody gięcia i jestem pewien, że w swego czasu też przez ten etap przeszedłeś. Poza tym mam z tego niezłą zabawę.
Motoda ogień i woda :-) jest tu również opisana:
And, finally, a fire was lit under the wood as it was kept wet with mops and brushes until the heat from the fire and the pressure from the weight gradually bent the wood to the desired shape.
No może gotowanie to faktycznie nie jest najlepszy pomysł, ponieważ włóka wyłażą... ale tak się właśnie człowiek uczy.
Lutownicę z okrągłym końcem, kupiłem tę od amati, napewno wielu widziało zdjęcia. Swego czasu Marecki pokazywał też swoje testy. I napewno będę ją używał do cieńszych listew. Jednak podczas prób gięcia 3 mm orzecha ta lutownica wydawała mi się dość mało skuteczna. I samo gięcie wales zapoczątkowałem na klocku o kstałcie dziobu - aczkowliek po wstępnym gotowaniu :S
Mam nadzieję, że dalej będziesz mi w jakiś sposób pomagał.
Pozdrawiam
Jurek
-
mirek
- Posty: 1879
- Rejestracja: 04 gru 2010, 21:55
Odp:Wodnik 1:50
Każdy z nas ma jakąś wypróbowaną metodę budowy czy wykonania pewnych czynności przy modelu . Uważam , ze każdy robi mu tak jak sie nauczył czy przyzwyczaił to wygląda tak jak to w tym przyslowiu :
Każda sójka swój ogonek chwali
Każda sójka swój ogonek chwali
Pozdrawiam Mirek Rybus